Virtual Environments. Can`t live with them. Can`t live without them.
by Bill Jellesma2019-12-08 17:00:00
I've written previously about virtual environments but rather than update that post on virtualenv, I wanted to write a new post on an alternative way to create virtual environments: pipenv. After learning about pipenv from a friend, I decided to give it a try and it is now my tool of choice. I had decided that I wanted to use pipenv over virtualenv but there was one problem, I needed to convert my project from using virtualenv to pipenv.
The Conversion
Fortunately, the process of converting from virtualenv to pipenv is fairly straightforward.
To get up and running with pipenv, you're going to want to download and install pipenv using
pip install pipenv.Commit all of your packages to requirements.txt. To commit all of the packages in your environment, use
pip freeze > requirements.txt.
Pipenv uses a pipfile rather than the classic requirements.txt. The pipfile more closely mirrors a package.json if you've ever used NodeJS. Whereas the requirements.txt is simply a text file with the packages and versions, a pipfile, among other cool features like specifying your version of python, separates dependencies into production packages and development packages. The advantage of separating packages into production and development is that users don't need to download every package just to run the code. If other contributing developers want all of the dependencies so that they can work on the code, they can simply download all of the packages.
For example, you may have flask listed as a production dependency for your project. If someone wants to use your app, they will need to download flask. You may also use the pytest package to test your code. For users running your app, they don't need to download pytest. However, a developer who wants to contribute to your project will need to download pytest in order to run their contributions through your testing suite. Therefore, pytest would be a development dependency.
- Create your new virtual environment with
pipenv shell.
Normally, this command is used to enter a virtual shell prompt. However, if this is the first time that pipenv is being run, it will create the virtual environment in addition to launching you into a new shell prompt.
One confusing caveat here is that using this on mac/linux will give you a nice new prompt to let you know that you're in the virtual environment. Because I first tried this on git bash for Windows, I was confused as I didn't see any indication that I was in the virtual environment. I was only able to tell that I was in the virtual environment by using pip list to show me that I was using a different set of packages.

You can exit the prompt with the simple exit command.
- Install dependencies from requirements.txt with
pipenv install.
When you run pipenv install, pipenv will look for a pipfile. If pipenv doesn't see a pipfile, it will create one; if it sees a requirements.txt file, it will download dependencies from that.
One note about this step if you're human like me, if you've updated your requirements.txt file after creating the pipfile, you can simply delete both the pipfile and pipfile.lock and run pipenv install again. Since it won't see the files, they will be created from requirements.txt. The main point is that I did this by accident and I probably (I hope) won't be the last one, so I wanted to note this.
To install packages from now on, we can use pipenv install <package_name>. If you'd like to install a dev only package like the testing packages I've described above, you can use pipenv install -dev <package_name>.
By Default, pipenv only installs packages listed under [packages] when doing pipenv install (notice no package is specified). If you have packages installed under [dev_packages] such as pytest, you would do pipenv install -dev. The latter command will install both [packages] and [dev-packages].
Modify your main commands. Instead of
python main.py, you can now dopipenv run python main.pywithout needing to enter the virtual shell prompt.Here's where pipenv starts to differ in the way that you use it. Virtualenv requires you to activate the virtual environment before running any of your code. Typically, what I used to do was to have a shell script to activate this virtual environment like
env.shso that I would runsource env.shand then runpython main.py. When I would want to work on another project, I would rundeactivateto leave my virtual environment. Withpipenv, all of this is simplified with one command to activate, run my code, and then deactivate my environment:pipenv run python main.py
Tips
Just like pip list, we can see all of our packages with pipenv graph. The advantage of pipenv graph here is that we can quickly and easily see packages that are dependencies in a tree structure.
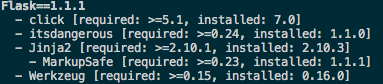
Although I haven't found much use for this graph structure, it is nice to know that some of the packages in my pipfile were not manually downloaded by me, but downloaded as a dependency of something else.
Problems
One problem that I ran into is that my .env files often have a json like syntax in it. This causes an issue as pipenv will only read one line of an environment. I found a github issue where people have similar issues, but I simply open the command pallet with vscode and use Join lines. If I need to see the json like syntax again, I can simply open the command pallet again and format the code.