Git Cheat Sheet
by Bill Jellesma2020-01-19 01:00:00

Intro
A powerful addition for any file based project is a versioning system. Notice that I said any file based project; this can apply not only to the most recent social media network that you're writing, but anything else from a router configuration to the latest vampire novel that you're working on. I like to think of my version system like playing video games when I was younger. Every commit is like a save point. Whenever I didn't get enough magic and died to the boss, I would simply revert back to the save point and it was like that failure never happened. Similarly, when I make a change to my code that introduces a new bug, I can simply revert to the most recent commit.
However, when I first heard of Git, it took me awhile until I started putting it into practice. I thought to put together a list of my favorite git commands that I use so that I and others can refer to this list:
git init
This is arguably the most useful command as this is the command that enables Git to do its thing. git init creates a hidden .git directory inside of your current working directory. This .git directory will contain all of the contents needed to track all of your file changes.
git add
git add <file(s)>
This command will add the files listed to what git refers to as the staging area. The staging area is what git will use to get your files ready to be committed. Most commonly, I use git add . to add all files tracked by git to the staging area.
This would also be a good time to mention the .gitignore file. Add this file to the root directory of any project. .gitignore files are simply a file with a file path and name on each line of files that you want to ignore. For example, the below .gitignore file will ignore passwords.txt and secure.txt inside the secure directory.
passwords.txt
secure/secure.txt
A .gitignore file is found to be very useful because then I can simply use git add . which will ignore adding any files in the .gitignore file.
git rm
git rm --cached <file>
This command will remove a file from the staging area. For example, if I were to accidentally do a git add . and forget to add my file of passwords to the .gitignore file, my file of passwords (passwords.txt) would be added to the staging area. I can simply use git rm --cached passwords.txt from the staging area so that my passwords file won't appear in any commit history. I will most often use this command to remove a sensitive file from my staging area and then immediately make an entry in my .gitignore file that will skip that file when using git add .
git commit
This is the command that will create a "save point" or "snapshot" for your project. The command will take all files in your staging area and create a commit hash that you can later use to revert to.
As a quick aside, I used to always associate Git and Github in my mind thinking that I needed to have a public repository on Github in order to use Git. Well, my vampire novel isn't fully fleshed out (pun intended) and still needs an antagonist so I don't want it to be public. You can use Git by itself to track the changes even if you want that novel to be private and only available on your computer. In fact, you can nowadays create a private github repo although I've never felt the need to use these private repos were a paid feature when I first learned Git.
git remote
git remote add <remote name> <remote url>
This command digs a little deeper. Remotes are like an alias that you'll use for git to know where to push code to and fetch code from. This can be a remote that points to a network location or github.com. <remote name> is a name that you give to identify your remotes. <remote url> is a url or address that you give to your remote to point to a git repository.
For example, when creating a repository on Github, they'll advice you to use a command such as the following:
git remote add origin https://github.com/test-user/test.gitIn the above command, origin is the name of the command and https://github.com/test-user/test.git is the url that points to your remote.
More about remotes
I ran into a situation where I cloned a git repo to my local machine and then wanted to change the origin remote to go to a new git url. I used git remote rm origin to remove the remote and then git remote add origin <remote url> for that to go to a new git repo. You can use git remote -v to view all of your remotes in order to verify that the change took effect.
git push
git push <remote name> <branch>
This will push your local git repository to your remote repository. Most commonly, this remote repository will be your Github repo; but you can also push to a remote repository on your network.
Again, Github will advice you to use a command such as the following:
git push -u origin masterWhere origin is the name of the remote. The master branch is setup by default when you create a code repository. The -u branch will set master as the upstream branch so that this will be the default branch when pushing, fetching, and pulling in the future.
Later, you'll be able to simply use git push as origin is recognized as the default remote when it is setup and master is the default branch.
Sidenote: push defaults
If receiving the following message when pushing everytime
warning: push.default is unset; its implicit value has changed in
Git 2.0 from 'matching' to 'simple'. To squelch this message
and maintain the traditional behavior, use:

  git config --global push.default matching

To squelch this message and adopt the new behavior now, use:

  git config --global push.default simple

When push.default is set to 'matching', git will push local branches
to the remote branches that already exist with the same name.

Since Git 2.0, Git defaults to the more conservative 'simple'
behavior, which only pushes the current branch to the corresponding
remote branch that 'git pull' uses to update the current branch.

See 'git help config' and search for 'push.default' for further information.
(the 'simple' mode was introduced in Git 1.7.11. Use the similar mode
'current' instead of 'simple' if you sometimes use older versions of Git)
Use git config --global push.default simple to just use the simple behavior which matches your current branch to the corresponding remote branch.
git pull
git pull
This command will simply grab all of the changes on your remote and sync them to your local repository. I like to use this command when I've made some changes on github and I want to sync them to my local computer.
git branch
git branch <branch name>
This command will create a new branch for your project. Going back to our video game metaphor, a branch is like when you would save your game in two save blocks. You would then do something wildly different on one save block like choose a new power up while choosing a new piece of gear on the other save block. On a programming project, you might choose to add a new feature for your users on a new project branch while still maintaining a stable branch of the project that users can download. It's a good idea to have a separate branch if you want to try out a new feature or a potential bugfix because if the changes end up not working, you can simply delete the branch with git branch -d <branch name>.
git merge
git merge <branch with changes> <branch for changes to be merged into>
If you've taken the advice of using a separate branch for a new feature or a bug fix, you'll need to be able to merge your code to your main branch after all of the tests are written. A merge is how you get your changes into your main code branch. Git Merge is important to get correct because if you have the branches in the wrong order, you may end up with a whole host of problems including merge conflicts.
Let's say that you've finished rewriting a module of code with a newer package on a branch called rewrite. After your code has passed all of the tests, you want to insert your code into the master branch with git merge rewrite master.
What if, after you've created the rewrite branch, you had to go to the master branch to create another change and this change on the master branch conflicts with the changes on the rewrite branch? If you use the above merge command, git will open the conflicting files in the text editor listed and ask you to decide the correct code since Git is now confused as to which code to use. An issue that I've found to be fairly common is that you may know that the code on the rewrite branch is correct. Maybe you've ensured that any code changes to master were also made to rewrite. You can use git merge -X rewrite master to instruct Git that the code on rewrite should be used if any conflicts arise.
git checkout
git checkout <branch name or commit hash>
Checkout is used as your main way to move between different states of your code repository. You can checkout a branch to switch to working on another branch of the project. You can also enter a commit hash to revert to a previous commit in your project. Let's say that you introduced a bad bug in your code and you only know that the problem first showed up three months ago. You can use git log to find the commits and all of their associated hashes. Find the hash of the commit from three months ago and use git checkout <hash>. You can now look at the code to see what has changed since then.
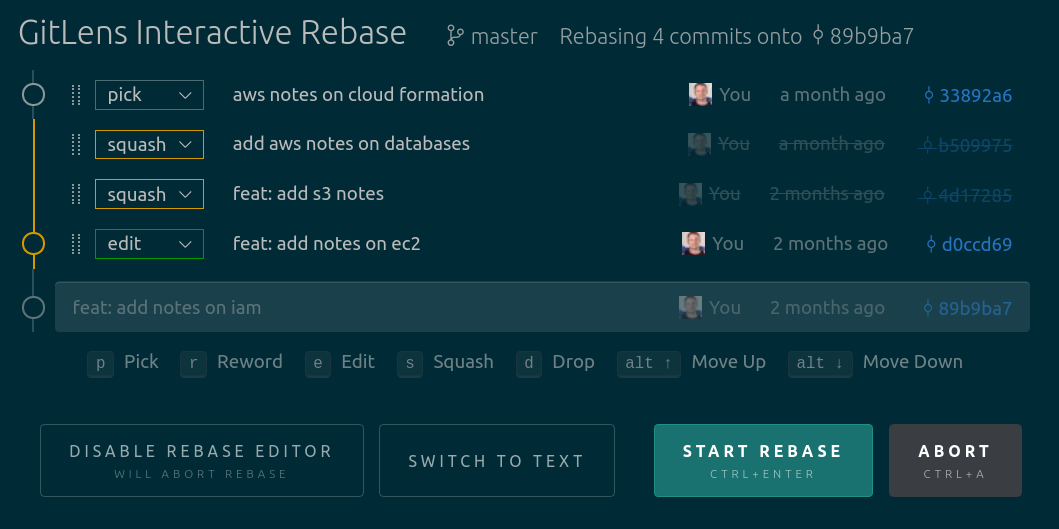
Git Interactive Rebase
Bring up the last N number of commits and choose to pick or squash them with git rebase -i HEAD~n where n is the number of commits to look back at. If you have Visual Studio code set as your default editor and the Gitlens extension, you'll be able to see a more interactive GUI.
Git Cherry Pick versus Rebase
Often Times, I find that my feature branch will get "stale" before it has a chance be merged back to main. What do I mean by stale? Let's go through a quick example.
Let's say that I'm want to add a new feature to a project so that every time I type the word party, it throws confetti across the screen. So I start working on this feature branch, branchA on May 1st by forking directly from main. I make commit A on May 2nd. But then I hear that there's a bug that everytime the word exit is typed, the program crashes. This is a bug that has to be finished ASAP so I immediately create a new feature branch, branchB, where, between May 2nd and May 5th, I make commits B-E. Now it's May 6th and the bug is now solved, I merge the feature branch including commits B-E into main.
Now I'm ready to work on my work on my party feature again. I make commit F and now I'm ready to merge this back into main. As I make a pull request, I find that I have a number of merge conflicts because all of these commits have touched similar code and git can't tell what to keep and what to throw out. To resolve this so that our pull request doesn't run into conflicts, we have two options: rebase or cherry pick. The option that you choose largely depends on the size of the project, the number of commits in your feature branch, and the number of people working on the project.
I've found that Rebasing should be your first attempt because this will rewind the branch that you're currently on until git finds a commit in common with the branch your rebasing and then attempt to apply all commits in order. This is a great method because it ensures that you'll get every commit on the feature branch. Let's see how this works in the command line.
git checkout branchAgit rebase main
You'll probably run into conflicts when rebasing. This is because multiple commits have edited the same codebase and git can't decide on its own which code to keep. Git will do this by placing markup in the files to indicate what code is currently on your branch and what code you're attempting to bring in. Visual Studio code will highlight these files as will as the conflicts and let you easily choose which code to keep. Let's say that you ran into a conflict in fileA. Once you solve the conflict, you would do git add fileA to add the file to the staging branch. You can then do git rebase --continue to move to the other conflicts or complete the rebase.
If rebasing is to complex and needs to rewind several hundred commits (You can view how many commits with ( RaD="$( git rev-parse --git-path 'rebase-apply/' )" && N=$( cat "${RaD}next" ) && L=$( cat "${RaD}last" ) && echo "${N} / ${L}" ; )), as may occur in large scale enterprise projects, my solution is to use cherry pick. What I'll do is to fork a new branch from main, find the SHA hash of the commit that I want to bring into my new branch (you can see the hash by using git log on the original feature branch), and then simply use git cherry-pick <commit hash>. The disadvantage and why this is usually my backup to rebasing is that this largely depends on knowing the exact commits that you want to bring. If you only have a couple of commits, this really isn't an issue.
Outro
By no means is this an exhaustive list of git commands but the above commands are the commands that I've found myself using most days. I'll probably update this list as I figure out better Git commands to use.