Upgrade Linux
by Bill Jellesma2020-05-11 23:15:00

It was one of those Saturday nights, the wind is howling, the roommates are busy playing videos games, and quarantine is not allowing anyone to go out to the bars. Rather than getting take out and watching a couple of episodes of The Expanse (an excellent sci-fi series), I decided to do something that's been on my list for a few months now, upgrade the Linux partition on my computer.
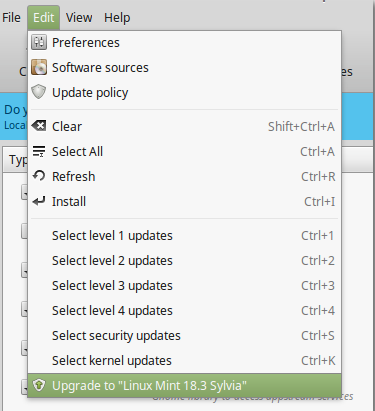
The first bit of advice that I have to share is that it's much easier to do a fresh installation of your Linux distribution (they're free anyway) rather than to do an in-place upgrade. The second bit of advice that I have is that unless your distribution is out of support or you're facing performance issues, it's not necessary to do a major upgrade of your distribution. In the case of Linux Mint, the versioning schemes typically go major.minor with a new major version being released on a near yearly basis (e.g. 2017 had versions 17-17.3, 2018 18-18.3, etc) to try to match Ubuntu. Given the advice about not needing to upgrade the major version of your Linux distribution, upgrading the minor version of Linux Mint is much simpler compared to upgrading the major version and can (and should) be accomplished through the update manager. The below image shows how you can upgrade from Linux Mint 18, 18.1, or 18.2 to 18.3 very easily. Notice that the codename of the new version is a female first name. Linux Mint codenames are alphabetically based on female names.
Given the above information, I decided to upgrade from Linux Mint 18.2 to 19.3 (the latest version released at the time of this writing). I found out that this is more of an upgrade path and I needed to go from 18.2 to 18.3 to 19 to 19.3. Here's a full account of my travels
- Check your current version of Linux Mint and upgrade your minor version if necessary
I first didn't even know the version of Linux Mint that I was running. So after finding out more about the different versions of Linux Mint, I decided that a good first step would be to figure out what version that I'm currently running. Since my go to thoughts are to use the terminal, I decided to go the more difficult and unnecessary route to figure this out through the terminal.
cat /etc/os-releaseFrom this, I found that I was running Linux Mint 18.2
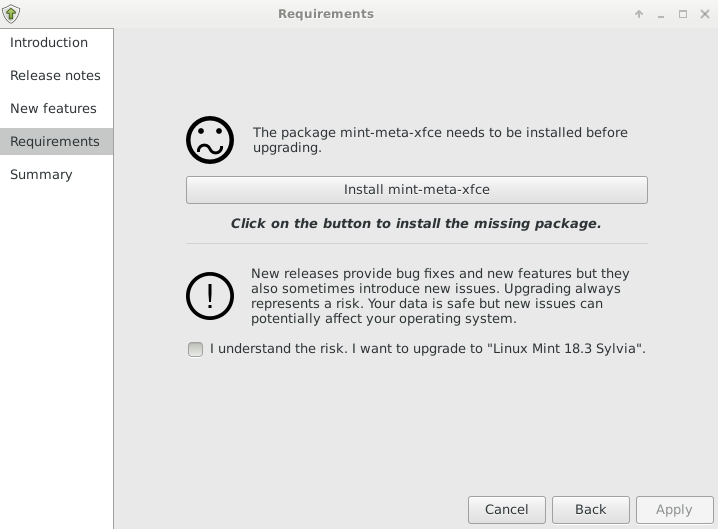
At first, I didn't know that I had to be on the latest minor version and I found out when trying to use mintupgrade later in this article, that this package was not available in the 18.2 repository but was in the 18.3 repository. Upgrading these minor versions I found is very easy, just launch Update Manager and select Edit -> Upgrade to Linux Mint 18.3. You'll be prompted with on screen instructions to complete the upgrade.
Many of the instructions that appear were just showing the new features of 18.3 so I could just press Next. However, in my case, I needed to install mint-meta-xfce before I could proceed because I had accidentally uninstalled it previously when trying to install KDE as my desktop environment (oops).
Once finished the download and installation (~10min), I was instructed to reboot the system.
Special Note: I was facing a lot of performance issues on my 18.2 machine (having trouble playing Youtube videos in 1080p) which prompted me to look at upgrading. Upgrading to 18.3 solved a lot of the performance issues I was seeing so, since 18.3 is supported until 2021, you may want to stop with 18.3 unless you're still facing some issues (remember, it's recommended to do a fresh install). I decided to upgrade to Linux Mint 19 for the experience of upgrading on my "lab" system.
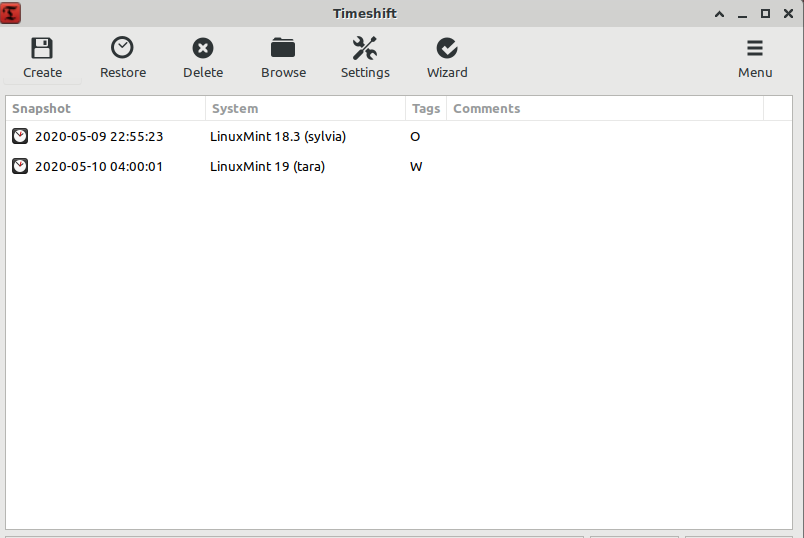
- Create a system snapshot using
Timeshift
This is very easy to accomplish as you can just hit create on this screen. Note that these timeshifts will take a lot of space (up to 10GB on my machine) on your hard drive. I ran into a situation where I created too many snapshots and was unable to continue with my upgrade until I deleted some of these snapshots.
As an aside, my problem was actually so severe that I was stuck in a login loop where I enter my password, the system looked like it would login, and then I'd get booted back. I ended up logging into a shell prompt (press CTRL+ALT+F1 at the login screen). and using the following command to find where I needed to delete files to make room:
sudo du --human-readable --one-file-system / -d1I needed the --one-file-system because I also had windows on the machine. I needed -d1 to only give me the first level directory. I subsequently removed the files using
rm -rf <file>where file is the name of the file or folder to be deleted.
- Figure out if you're using lightdm as your display manager
cat /etc/X11/default-display-managerYou're looking for the result to be /usr/sbin/lightdm. If this is the case, you can simply proceed to the next step.
If the result is /usr/sbin/mdm, you'll want to install lightdm and switch to it
apt install lightdm lightdm-settings slick-greeterWhen asked to choose a display manager between MDM and LightDM, choose LightDM.
apt remove --purge mdm mint-mdm-themes*
sudo dpkg-reconfigure lightdm
sudo reboot- Make sure that the system is updated through APT
In my case, this is where I ran into issues. When I refreshed the update manager, I received the following error:
The repository may no longer be available or could not be contacted because of network problems. If available an older version of the failed index will be used. Otherwise the repository will be ignored. Check your network connection and ensure the repository address in the preferences is correct.The repository in question was https://dl.yarnpkg.com/debian and the problem was that the GPG key has expired. After a little searching, I found that the answer was to add a new key with:
curl -sS https://dl.yarnpkg.com/debian/pubkey.gpg | sudo apt-key add After adding a new GPG key, I was able to refresh and install all updates very easily
- Simulate an update with
mintupgrade
Install mintupgrade with sudo apt-get install mintupgrade && mintupgrade check. This is a very important step. Your Apt sources are temporarily switched to Linux mint 19 Repositories but no packages will be upgraded. The point of this is so that you can be alerted as to the packages that will be removed as well as the packages that will cause conflicts. Fortunately, I did not have any packages that contained conflicts but I did have a few packages removed so I scrolled to the removed section and took a screenshot just in case I wanted to re-install these after the upgrade.
- When ready, download the new package needed for Linux Mint 19
If you're happy with the output of mintupgrade check and have taken note of the removed packages, it's time to download the new package for Linux Mint 19 with mintupgrade download. Your repositories are also permanently switched to point to Linux Mint 19 repositories.
- Finally, install Linux Mint 19
Finally, use the following command to install Linux Mint
mintupgrade upgradeI ran into an issue where I needed to stop my postgresql service with
systemctl stop postgresqlThis entire process will take up to a couple of hours to finish successfully but you'll be able to continue using your computer the entire time. Use this time to go make a sandwich, take a shower, go bowling, etc.
- More updates
The first thing that I did when I got my Linux Mint 19 was to check for more updates. Sure enough, through update manager, I found that I could update to 19.3. Now I'm familiar with the drills, check for any updates through update manager, create a snapshot with Timeshift, and finally, update to 19.3 through the Edit menu in update manager.
I did all these previous steps once again and upgraded my machine to 19.3.
The good news throughout all of this is that June 2020 (a month from the time of writing), Linux Mint 20 is expected to be released.