Angular Concepts
by Bill Jellesma2020-11-10 20:45:00

Table of Contents
- Components
- Interfaces
- Pipes
- Two Way Binding
- Class and Style Binding
- ngClass and ngStyle
- ngForm and Form Validation
- ngFor and ngIf
- Event Binding
- Input
- Services
- Routers
- HTTP
- Outputs and Event Emitters
A fond memory of mine is coming how from school and making flash cards until I was too tired to make anymore. That being said, I'm sure the memory was more painful than I remember. Well, I figured that I'd need to upgrade my process for the new age so here we go.
workspace - Contains the files for one or more projects
Project - the set of files that comprise an app, a library, or an end-to-end test
Components
A Component is Fundamental building blocks of Angular applications. They display data on the screen, listen for user input, and take action based on that input. A component will always contain the @Component annotation.
Sidenote: Every component must be declared in exactly one NgModule decorator (more on decorators below). An example of declaring the Heroes Component from the tour of heroes app is shown below. Fortunately, the work of importing and declaring the component are done for you when using the CLI (more information on using the CLI to generate components is available in my Angular Cheat Sheet article).
@NgModule({
  declarations: [
    AppComponent,
    HeroesComponent
  ],
  imports: [
    BrowserModule
  ],
  providers: [],
  bootstrap: [AppComponent]
})
2nd Sidenote: When a component becomes large and serves multiple purposes, you should consider refactoring that one component into two or more components. Taking from the Angular tour of heroes example, the heroes component eventually contains both a list of heroes and then a toggleable details section for the heroes. Since the component is now serving more than one purpose, hosting the list and details, it is recommended that you seperate this into a hero component and a hero-detail component. This has the advantage that the detail is reusable so that you can use it on different parts of the app and is more maintainable as you know that working on the detail component will only affect the detail component.
String Interpolation
Interpolation Binding - This is the double curly braces that appear in a component's template. These are defined in the component's typescript file and sent to the template. For example
<h1>{{title}}</h1>ngNonBindable
If, for some reason, you don't want the string interpolation to work, you can use ngNonBindable
<li *ngIf="user.registered" class="list-group-item" ngNonBindable>Registered: {{user.registered | date:'MM/dd/yyyy'}}</li>This might be useful if you want to create code in a blog post or something thing like that.
Template Reference Variables
In addition to Interpolation Binding, you can also use Template Reference variables to create variables directly in the templates.
<button #toggleButton>Button Toggle</a>src/styles.css is a file where application wide styles are meant to be placed to make the styles consistent across the entire application
Decorator Function - specifies the Angular metadata for the component, module, directive, etc. An example would be that a component will always be created with the @Component decorator function, as seen below. When you choose to create a decorator on your own, you are annotating the class.
@Component({
  selector: 'app-component',
  templateUrl: './component.component.html',
  styleUrls: ['./component.component.css']
})
In the above decorator function, we have the following metadata properties:
- selector is the component's CSS element selector.
app-componentmatches the name of the HTML element that identifies this component within a parent component's template. - templateUrl is the location of the component's template file
- styleUrls is the location of the component's private CSS styles
ngOnInit() is a lifecycle hook and is called shortly after creating the component. constructors should do no more than initialize local variables and should NOT fetch data from external sources. For fetching data from an external source such as a server, you should use ngOnInit() to call a service (defined below). You can read more about Component Lifecycles by visiting https://angular.io/guide/lifecycle-hooks
Interfaces
An interface is like a blueprint to explain the type that a javascript object should conform to and of what type each property of the object should be. Because Angular uses typescript (just another layer on top of javascript, completely compatible with javascript), objects can use these interfaces for type checking. If used, the object will throw an error to the compiler if the object is not of the type specified by the interface. For example (the example from the tour of heroes tutorial), if you have the following interface:
export interface Hero {
  id: number;
  name: string;
}
id and name will be required fields whenever we're typing a Hero object as below. You can also include an optional field using a question mark before defining the type.
export interface Hero {
  id: number;
  name: string;
  age?: number
}
and then later on have a hero object defined as the following. Notice the : Hero is typescript feature forcing type checking on the object. Remember to import the interface if it's in a separate file.
import {Hero} from '../models/hero'
hero: Hero = {
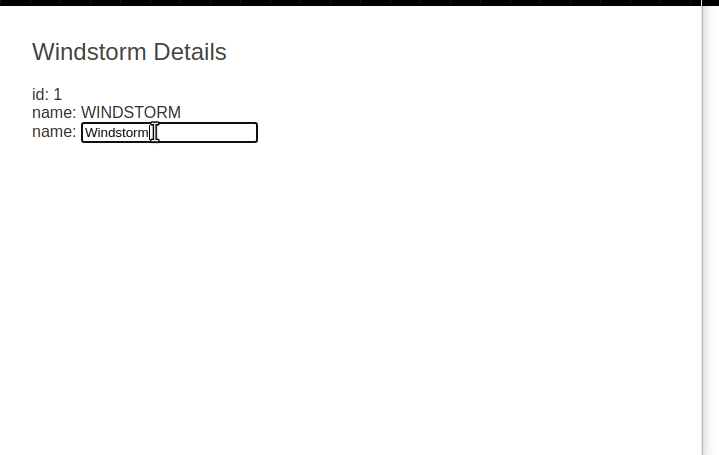
id: 1,
name: 'Windstorm'
};Sidenote import this Hero interface can also be referred to more generally as importing a symbol
The compiler will throw an error if you try to use
hero: Hero = {
    id: 1,
    name: 2
  };
Because you've changed the name property to be of type number.
Interfaces are usually created in their own files and are not generated by the CLI. I like to use one interface (maybe multiple if I have similar types (hero and heroes)) per file and create those files in a folder I create called src/app/models.
Pipes
Pipes are simple functions used in template expressions (such as interpolation bindings) to accept an input value and transform it to a specified output. Pipes can be used to transform strings, currency amounts, dates, and other data for display. For example, the tour of heroes app in the angular docs will have you create an object
hero = {
  id: 1,
  name: 'windstorm'
}
but use the built in UppercasePipe when displaying it in a template
<div><span>name: </span>{{hero.name | uppercase}}</div>so that it renders as WINDSTORM rather than windstorm
You can find more information one using parameters to specify date codes with the date pipe, chaining pipes, and creating custom pipes by visiting https://angular.io/guide/pipes. You can find a full list of built in pipes by visiting https://angular.io/api/common#pipes.
Two Way Binding
Two Way Binding means that the data can flow in two directions. At Angular's core, this means the data and the model (class) will always be in sync. This is done using a directive in angular known as ngModel. In order to use this directive, we first need to import the FormsModule into our app.module.ts file. FormsModule is where the ngModel directive is defined and is not included by default when you start a new project but is very easy to import.
- In
app.module.ts, import the FormsModule using the following syntax at the top of the file
import { FormsModule } from '@angular/forms';- The FormsModule must be included in the imports array of the NgModule decorator, also in
app.module.ts
@NgModule({
  declarations: [
    AppComponent,
    HeroesComponent
  ],
  imports: [
    BrowserModule,
    FormsModule
  ],
  providers: [],
  bootstrap: [AppComponent]
})
Now, back in heroes.component.html, we can include an input textbox with the ngModel directive. Angular's syntax for two way data binding is [()] so don't forget to include the ngModel directive in this.
<div>
    <label>name:
      <input [(ngModel)]="hero.name" placeholder="name"/>
    </label>
  </div>
Now, whenever we type a new name in the textbox. The displayed name above that will change.
This could also come in handy when creating a form
<input [(ngModel)]="user.firstName" type="text" class="form-control" name="firstName">Now when we click the submit button, we'll have the variable available to us
<button (click)="addUser({firstName: user.firstName, isActive: true})" [disabled]="!enableAdd" class="btn btn-block mb-3" [ngClass]="currentClasses">Add New User</button>Class and Style Binding
Similar to ngClass and class binding, you can also use style binding
<li class="card card-body mb-2" *ngFor="let user of users" [class.bg-light]="user.isActive" [style.border-color]="user.isActive ? 'green' : ''">So Bg-light is assigned as a class only if user.isActive evaluates to true. Similarly, the border-color style is set to green if user.isActive evaluates to true and sets nothing to that style if false.
ngClass and ngStyle
To take class and style binding a step further and set class and style on a tag using an object, you can use ngClass and ngStyle respectively.
<button [disabled]="!enableAdd" class="btn btn-block mb-3" [ngClass]="currentClasses">Add New User</button>In our typescript component, we'll use currentClasses as an object that you can set with a method call. ngClass will then bind the class btn-success to the element if this.enableAdd (a component property) evaluates to true.
setCurrentClasses(){
        this.currentClasses = {
            'btn-success': this.enableAdd
        }
    }
The advantage with this approach is that you can set multiple classes that all have their own associated booleans
setCurrentClasses(){
        this.currentClasses = {
            'btn-success': this.enableAdd,
            'big-text': this.loaded
        }
    }
Similar logic applies to ngClass.
<button [disabled]="!enableAdd" class="btn btn-block mb-3" [ngStyle]="currentStyles">Add New User</button>setCurrentStyles(){
this.currentStyles = {
'bg-light': this.enableAdd,
'mb-3': this.loaded
}
}ngForm and Form Validation
ngForm is a directive included in the Angular Forms Module that will provide easier submission and validation.
We first need to import the FormsModule into our app.module.ts file. FormsModule is where the ngModel directive is defined and is not included by default when you start a new project but is very easy to import.
- In
app.module.ts, import the FormsModule using the following syntax at the top of the file
import { FormsModule } from '@angular/forms';- The FormsModule must be included in the imports array of the NgModule decorator, also in
app.module.ts
@NgModule({
  declarations: [
    AppComponent,
    HeroesComponent
  ],
  imports: [
    BrowserModule,
    FormsModule
  ],
  providers: [],
  bootstrap: [AppComponent]
})
Now, we're ready to use ngForm in our angular application.
Take the following form for example:
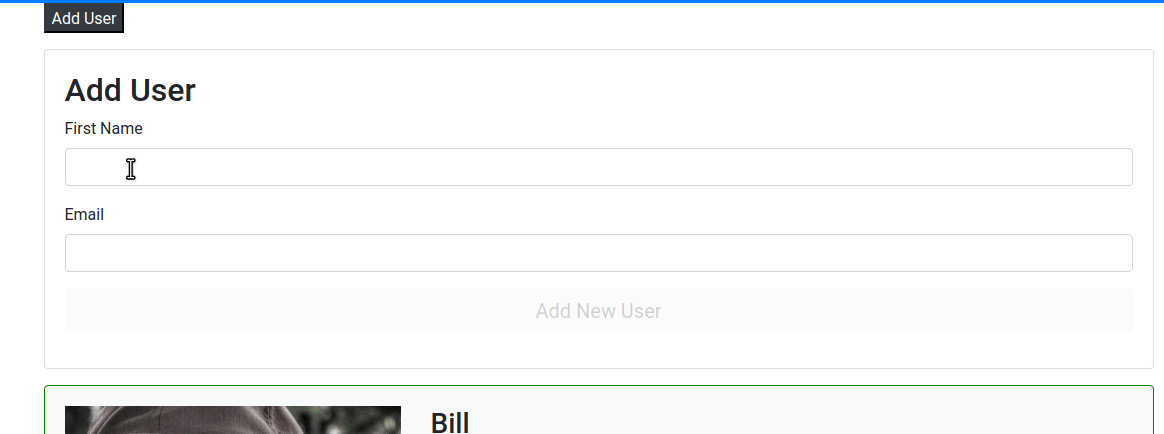
<form #userForm="ngForm">
            <div class="form-group">
                <label>First Name</label>
                <!-- is-invalid and invalid-feedback are bootstrap UI classes -->
                <input [(ngModel)]="user.firstName" type="text" class="form-control" [ngClass]="{'is-invalid': userFirstName.errors && userFirstName.touched}" name="firstName" #userFirstName="ngModel" required minlength="2">
                <div class="invalid-feedback">First name required</div>
            </div>
            <div class="form-group">
                <label>Email</label>
                <input [(ngModel)]="user.email" type="text" class="form-control" name="email">
            </div>
            <button [disabled]="!userForm.form.valid" class="btn btn-block mb-3" [ngClass]="currentClasses">Add New User</button>
        </form>
Notice that we're declaring a template variable called #userForm that we're setting equal to ngForm.
Now, notice that our username input field has the required and minlength=2 attributes. The button to submit the form at the bottom has a property binding that will set disabled to true if the userForm.form.valid variable is set to false. This variable will be set to false unless that required and minlength=2 attributes pass the validation.
The ngSubmit event is just like a regular submit event except that event.preventdefault() is set automatically to prevent a submit event on the user experience.
<input [(ngModel)]="user.firstName" type="text" class="form-control" [ngClass]="{'is-invalid': userFirstName.errors && userFirstName.touched}" name="firstName" #userFirstName="ngModel" required minlength="2">Notice in the firstName input that we're also creating a template variable called #userFirstName. Now, we can access certain variables of this element on the tag itself. For example, we're using [ngClass] to set the bootstrap is-invalid class. is-invalid is just a special class in bootstrap that will highlight the field in red.
<div class="invalid-feedback" [hidden]="!userFirstName.errors?.required">First name required</div>
<div class="invalid-feedback" [hidden]="!userFirstName.errors?.minlength">Must be at least two characters</div>
We can also use these template variables to give a hidden attribute to these tags based on if a certain validation attribute is violated. Again invalid-feedback is a bootstrap class that is designed to appear with its corresponding is-invalid class.
Now, to actually submit the form, we'll want to use event binding on the form tag to an event called ngSubmit and pass in the form template variable. ngSubmit is an event just like a regular submit event except that the event doesn't cause a submit event on the browser causing the page to refresh (this is typically done by calling event.preventdefault(), ngSubmit will just include this statement automatically).
<form #userForm="ngForm" (ngSubmit)="onSubmit(userForm)">In the component typescript, we'll want to add an import for ViewChild. ViewChild is a decorator that will give us access to child component properties. In our case, we'll be giving access to the form.
import {Component, ViewChild} from '@angular/core';and then we'll want to create a property called form with the ViewChild decorator. The ViewChild Decorator will also take the name of the template variable.
export class UserComponent {
    ...
    user: User = {
        firstName: '',
        age: null,
        address: {
            street: ''
        },
        email: ''
    }
    @ViewChild('userForm') form: any;
...Note: Make sure to initialize the user property on the component. You will receive errors if you don't because ngModel is expecting an initial value.
We can now create an onSubmit method which will take an object with the value and the valid status. Notice that because it's typescript, we're able to ensure the types of value and valid. Our method will simply check if the form is valid (this can act as another layer of checking if we're also using form validation) and push the value onto the array if the valid check passes. Lastly, we'll access the form object set with the ViewChild decorator to reset the form.
onSubmit({value, valid}: {value: object, valid: boolean}){
        // if validation is not passed
        if(!valid){
            console.log('Form is not valid')
        }else{
          // if valid passes, we'll push them onto the array
            this.myArray.push(value)
            //reset the form
            this.form.reset();
        }
    }
ngFor and ngIf
A useful feature for any framework is to be able to loop through an object. In Angular, we can accomplish this with an ngFor, angular's repeater directive. This is a directive that, when attached to an element, will repeat the element for the entire list. Using angular's tour of heroes app again, let's define a list called heroes inside heroes.component.ts inside of the class.
export class HeroesComponent implements OnInit {

  heroes = [
    { id: 11, name: 'Dr Nice' },
    { id: 12, name: 'Narco' },
    { id: 13, name: 'Bombasto' },
    { id: 14, name: 'Celeritas' },
    { id: 15, name: 'Magneta' },
    { id: 16, name: 'RubberMan' },
    { id: 17, name: 'Dynama' },
    { id: 18, name: 'Dr IQ' },
    { id: 19, name: 'Magma' },
    { id: 20, name: 'Tornado' }
  ];

  constructor() { }

  ngOnInit(): void {
  }

}
We can then iterate over this list in heroes.component.html by attaching *ngFor='let hero of heroes Notice that we're using an * character before the directive name and a javascript let statement. Inside of the element with the directive, we can interpolate hero and any property on hero
<ul class="heroes">
  <li *ngFor="let hero of heroes">
    <span class="badge">{{hero.id}}</span> {{hero.name}}
  </li>
</ul>
The ngIf directive is similar to ngFor in that it brings a dynamic programming like construct to template files. ngIf can be used to display a certain element or even a whole section only if the condition is true. For example, if we have a div element in our html that we only want to display if the selected element is equal to 3, we would use the following
<div *ngIf="selected == 3; else notSelected">
  <p>Hello World</p>
</div>
Then the div element and its child paragraph element would only be shown if selected is equal to 3.
We've also used an else statement to refer to notSelected. This will be a template variable that we'll set with ng-template
<ng-template #notSelected>Not Selected</ng-template>This can come in handy if you want to display a list of users but then display separate content if no users are found.
<ul *ngIf="users; else noUsers">
  <li *ngFor="let user of users">{{user}}</li>
</ul>

<ng-template #noUsers>Sorry, there are no users to display</ng-template>
Event Binding
Events occur whenever a user interacts with an element such as by clicking it, or inputting text. Angular has it's own Event Binding syntax to handle these events. The syntax is similar to any other directive except you want to use parentheses around the directive.
<li (click)="onClick(hero)">In the above example, we've attached a click event to the li element which will call the onClick() method defined in the component class and pass in hero as the argument. For more information about event binding syntax as well as more advanced concepts of creating custom events with EventEmitter, visit https://angular.io/guide/event-binding
Input
An Input can be used to pass data from one component to another within the same project. For example, the tour of heroes app has two components, hero and hero-detail, of which the hero component will let you select the hero while the hero-detail will render details on the selected hero from the hero component. In order to get the selected hero from the hero component to the hero-detail component, we make use of an input on the hero-detail component. This allows us to pass the selected hero in a special input directive on the selector fro the hero-detail component.
<app-hero-detail [hero]="selectedHero"></app-hero-detail>Notice that the input hero is in square brackets and is set equal to the selectedHero a variable defined in the hero component class, hero.component.ts. More generally, directives like this are known as Property Binding and you can learn more about this by visiting https://angular.io/guide/property-binding
On the hero-detail component class, hero-detail.component.ts, we'll need to import Input since it's not imported by default, and define the Input as a variable on the class using the @Input decorator syntax.
import { Input } from '@angular/core';

@Component({
  selector: 'app-hero-detail',
  templateUrl: './hero-detail.component.html',
  styleUrls: ['./hero-detail.component.css']
})
export class HeroDetailComponent implements OnInit {

  @Input() hero;
  ...
}
Sidenote Because the hero component will allow the user the selection of a hero while the hero-detail will show the detail of the selected hero, it may be referred to as parent/child relationship where the hero is the parent and the hero-detail is the child.
2nd Sidenote Angular also has the concept of Outputs and more one-way binding which can be read more about by visiting https://angular.io/guide/inputs-outputs
Services
Following the dependency injection architecture of Angular, data that you wish to display should be defined in a Service rather than in a component. This helps make code more maintainable because if you ever want to change how you receive the data, you only have to change the service that the data is defined in, rather than potentially multiple components. Services must be made available to Angular's dependency injection system through Providers. When using the Angular CLI to register a service, Angular will register a provider with the root injector. This can be seen in the @Injectable decorator.
@Injectable({
  providedIn: 'root'
})
Now, in a component class that you want to use methods defined in a service, you inject the service in a constructor of a component. Injection follows Angular best practices in that it will load the service as a dependency at runtime of the component. To use Angular's tour of heroes example again, the hero component will inject the hero service into its constructor.
...
export class HeroesComponent implements OnInit {
  heroes
  constructor(private heroService:HeroService) { }
  ...
The above definition will make all of the methods and variables of HeroService available through the private declaration heroservice and can be accessed just as any other class definition using the this keyword. The declaration is private if it is only intended to be used in the class that it's defined in. The declaration will be public if we intend to use the service in other features of the component such as the component template. For example, the getHeroes() method is accessed and assigned to heroes with the following
this.heroes = this.heroService.getHeroes();getHeroes() in hero.service.ts is defined to get a constant that we've defined which makes this a synchronous operation which is why the above assignment works.
getHeroes(): Hero[] {
    return [
      { id: 11, name: 'Dr Nice' },
      { id: 12, name: 'Narco' },
      { id: 13, name: 'Bombasto' },
      { id: 14, name: 'Celeritas' },
      { id: 15, name: 'Magneta' },
      { id: 16, name: 'RubberMan' },
      { id: 17, name: 'Dynama' },
      { id: 18, name: 'Dr IQ' },
      { id: 19, name: 'Magma' },
      { id: 20, name: 'Tornado' }
    ];
  }
When getHeroes() is defined to get data from a real external source, the data will need to be retrieved asynchronously using a subscription or promise. This is because most of the time, service methods such as getHeroes() will use HttpClient.get() which returns an observable that must be subscribed to. For just talking about services, using the synchronous operation of retrieving a constant works.
Routers
An Angular Router is a special module that imports certain routing properties and registers an array of objects (routes and components) that you define. The easiest way to get up and running with a router is to select it from the start. When you create the app with the CLI via ng new <project>, the CLI will ask you if you want a router.
If you didn't select to include routing, you can still use the CLI to create a new module with ng g m app-routing --flat --module=app. This will create an app-routing.module.ts file in src/app and will register the module in the imports array of app.module.ts. You will also want to import the router, define a routes array, add RouterModule.forRoot(routes) to the imports array, and add RouterModule to the exports array. The end result should look like the following. The forRoot() is a special method on the RouterModule that will register the array of routes that you've defined.
import { NgModule } from '@angular/core';
import { Routes, RouterModule } from '@angular/router';

const routes: Routes = [];

@NgModule({
  imports: [RouterModule.forRoot(routes)],
  exports: [RouterModule]
})
export class AppRoutingModule { }
Within this file, also import any components that you want to be included in the router. Each element in the routes array will be an object of {path:path, component:component} where path will be the relative path that you want to make the component available on and the component will be the component that you'd like to display.
const routes: Routes = [
  { path: 'heroes', component: HeroesComponent }
];
Additionally, we can add an object that will redirect to another path. In the following code, we add an object so that if the user navigates to /, they will be redirected to /heroes
const routes: Routes = [
  { path: '', redirectTo: '/heroes', pathMatch: 'full'},
  { path: 'heroes', component: HeroesComponent }
];
A special route that can used for pages not found can also be added to the routes array. Notice that we're setting path to '**'
const routes: Routes = [
  ...
  {
    path: '**',
    component: NotFoundComponent
  }
];
Another useful feature of the Angular Router is to add a parameterized route so that the route can have a placeholder that is filled in at runtime. Angular uses a colon to distinguish parameters.
{ path: 'detail/:id', component: HeroDetailComponent },As for the template file, in order to create a link to this component, you will use the following, routerlink is a special attribute that should be the same as one of the paths in the path array above. Routerlink is used because it takes advantage of the SPA nature of Angular.
<nav>
    <a routerLink="/heroes">Heroes</a>
</nav>onNewPost(post: Post){
    this.posts.unshift(post)
  }ils/{{hero.id}}">Hero details</a>
</nav>
Let's say that you have multiple links in your navigation and you want the UI to denote which route is active and highlight it. Angular actually has two special directives that you will want to attach to the list element containing the route, [routerLinkActive] and [routerLinkActiveOptions]. The [routerLinkActiveOptions] directive should be set to {exact: true} which will give the highlighted look that you're after
<ul class="navbar-nav ml-auto">
    <li class="nav-item" [routerLinkActive]="['active']" [routerLinkActiveOptions]="{exact: true}">
        <a routerLink="" class="nav-link">Home</a>
    </li>
    <li class="nav-item" [routerLinkActive]="['active']" [routerLinkActiveOptions]="{exact: true}">
        <a routerLink="users" class="nav-link">Users</a>
    </li>
    <li class="nav-item" [routerLinkActive]="['active']" [routerLinkActiveOptions]="{exact: true}">
        <a routerLink="posts" class="nav-link">Posts</a>
    </li>
</ul>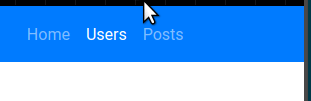
Finally, Angular's <router-outlet> is used in the template for where you want the component that you've navigated to to appear. Because Angular reuses as many components as possible in favor of performance, if the user types a new route in the address bar of the browser (/heroes), Angular will only replace where router-outlet is defined.
<!-- router outlet will tell angular where to display the routed view -->
<router-outlet></router-outlet>
When you're using parameterized routes, the information in the route may become useful for your component. For example, if you use the above parameterized route, navigating to /details/11 will mean that the component will need to get a hero with the id of 11. In order to get the information in the route, we'll inject a service called ActivatedRoute and get the parameter id by getting it from the parammap dictionary provided by the service.
import { ActivatedRoute } from '@angular/router'; // used to get the current route
...
export class HeroDetailComponent implements OnInit {

  ...

  constructor(private route: ActivatedRoute) { }

  ngOnInit(): void {
    this.getHero();
  }

  getHero(): void {
    //+ converts the returned string to a number
    const id = +this.route.snapshot.paramMap.get('id');
    ...
  }

  ...

}
HTTP and Observables
In order to get resources from the web, the HttpClientModule is used to send requests and receive responses. You'll first want to import this module into your app.module.ts file and add it to the imports array of the @NgModule decorator. Importing this module will make it available throughout your entire app.
import { HttpClientModule } from '@angular/common/http';@NgModule({
imports: [
HttpClientModule,
],
})You'll need to inject the HttpClient Service where you plan to use it
import { HttpClient } from '@angular/common/http';constructor(private http: HttpClient) { }You can now use this defined http variable to call on a web service. In the following example, we're making a GET request. Notice that this GET request will return as RxJS Observable. This means that we will need to subscribe to this method call. url is a variable that we've defined above as a string like http://example.com and we're type checking the returned observable as the generic object[]
getHeroes(): Observable<object[]> {
  return this.http.get<object[]>(this.url)
}
Error handling for this specific api request can be done using the RxJS catcherror() operator. The catcherror() operator will listen for any errors and return this to handleError(). handleError() is a private method that we've defined that will log the message to the console and then keep going.
import { catchError } from 'rxjs/operators';getHeroes(): Observable<object[]> {
return this.http.get<object[]>(this.heroesUrl)
.pipe(
catchError(this.handleError<object[]>('getHeroes', []))
);
}private handleError<T>(operation = 'operation', result?: T) {
return (error: any): Observable<T> => {
// TODO: send the error to remote logging infrastructure
console.error(error); // log to console instead
// TODO: better job of transforming error for user consumption
this.log(`${operation} failed: ${error.message}`);
// Let the app keep running by returning an empty result.
return of(result as T);
};
}If your API requires you to use certain headers when making requests, you can make these by creating an object called HttpHeaders that will hold the http headers in an object.
import { HttpHeaders } from '@angular/common/http';httpOptions = {
headers: new HttpHeaders({ 'Content-Type': 'application/json' })
};Notice that, unlike services, we are not using dependency injection and are instead using the new keyword to create an object. This is because the headers object must be instantiated with the headers.
Outputs and Event Emitters
Outputs are how we can get data from one component to another. We did this by instancing a new EventEmitter object.
- We'll want to import the classes from
@angular/core
import { EventEmitter, Output } from '@angular/core';- Now we can use the
@Output()decorator to createnewPost, an object which is an instance ofEventEmitter
@Output() newPost: EventEmitter<Post> = new EventEmitter();- On that same component, we can now emit a
Postto a property callednewPost.
this.postService.savePost({title, body} as Post).subscribe((post) => {
      this.newPost.emit(post)
})- On the selector for the component, we'll create an event like any other but use the property
newPostas the name of the event and attach this to a method that we'll create on the component where we include the selector. This would be the parent component. For example, if we're emitting an event on a component calledpost-form, we'll create theonNewPostmethod on thepostcomponent.
Note Be sure to pass along the $event as an argument to the method
<app-post-form (newPost)="onNewPost($event)"></app-post-form>- Finally, on the
postcomponent, we can now create a method to accept that argument
onNewPost(post: Post){
    this.posts.unshift(post)
  }