Python Flask Basic App
by Bill Jellesma2020-11-16 20:45:00

I have always found Flask to be nothing short of amazing for building APIs. However, I find that whenever I start a new Flask Application, I always find a couple different ways to start building the app.
- Copy from another Flask Application that I've built. Often, this is my most common method. The downside here is that I have to strip out all of the unnecessary imports and object initializations.
- Use the code directly from the Flask Documentation. The downside here is that it doesn't offer the scalable nature that I've become used to with using Blueprints and the
.flaskenvfile to define common environment variables. - Using Miguel Grinberg's excellent Flask Mega-Tutorial. My usual Pythonic habits have taken a lot of inspiration from his post. The only qualm that I have is I need some quick and concise code.
So, after having started a new Flask Application slightly differently every time, I've decided to create a short post of the basic boilerplate that I use. Putting it on my blog allows me to access it from anywhere whether it be work, home, or at a Coffee Shop (preferably after Covid passes as this is written during a pandemic).
Directory Structure
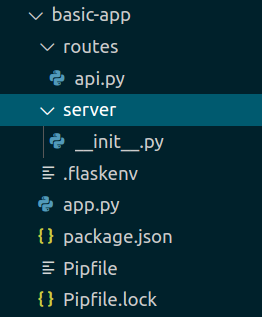
Here's the basic Directory Structure that I use. I like the idea of using an __init__ file to start my app and having a separate directory to hold my routes. I usually have at least an api.py file that I'll use to create my api routes. I have also been known to have other route files that serve HTML rather than using a javascript frontend such as Angular.

Needed Packages and Commands
Once you create a new directory to house your application. Use the following commands while inside that directory.
pip install pipenvAlthough this works without a virtual environment. I'm a big fan of using virtual environments to keep packages separate from your entire system. I've previously heralded the triumphs of pipenv so I'll not do that here.pipenv install Flask python-dotenvFlask will obviously be need for a flask app so that makes sense.python-dotenvis a package for creating environmental variables. If Flask detects that you're usingpython-dotenv, it'll automatically recognize the.flaskenvfile that we'll create later on.npm init -ynpm is also an excellent resource I've previously talked about.npm initwill create a newpackage.jsonfile that we'll use later and the-yflag will simply accept the defaults when creating the file.
API Route (and boiler plate for other routes)
Below is the code for api.py. Notice that I'm using a Blueprint object that I'll import back to the __init__ file later. I like using blueprints to help keep my routes separated. For example, if I had another file, movies.py, I can use another blueprint object. If nothing else, this helps keep the routes organized in my mind.
Init File
__init__.py is the file that I use to start the flask app. __init__.py is a special filename and MUST be the name of the file. Also explained below, __init__.py tells Python to treat the containing directory as a package that we can import. I learned in a Udacity Nanodegree Class to use a create_app function and have like using the idea ever since because I find that it helps to keep my code more organized. Notice that I'll also import the blueprint object to this file and then register the blueprint in the create_app function. Also, having an optional test_config parameter allows us to later pass in a test configuration for testing.
App
app.py is basically a file to create an entry point for our application. The file is called app.py simply by convention. You can rename the file to fred.py and it'll still work the same. The import part is that Flask will see that it contains a function call, create_app which will initialize the app. Also, notice that the line from server import create_app indicates that we're searching the server package. Even though server is not a file but a directory, it contains a file called __init__.py. __init__.py is a special filename that makes server into a package.
NPM and Package.json
Package.json and npm are optional. I find that it serves a great task runner even in non javascript app but it's not necessary to run your app and just requires you to run a longer command. Notice in the scripts key that we've defined an entry called server that will run pipenv run flask run. This is just the basic command to start the flask server that is aliased so that you can start the server with npm run server. Though this is an optional file, I would recommend it as you can add more scripts later and not need to remember as many long and confusing commands.
flaskenv
.flaskenv is where installing python-dotenv above came in handy. Flask normally requires you to export these two variables for every terminal session that you use. Though this file is also optional, this file will automatically export those variables. FLASK_APP is always set to the package that starts the app. In my case, server is the directory containing the special __init__.py file. FLASK_ENV tells Flask if it should include extra debugging features such as automatically restarting the server on code change. Possible values are development and production. development contains the mention debug features.
FLASK_APP=server
FLASK_ENV=development
Pipfile
Pipfile is a file that should be generated by the above pipenv commands. This file should NOTE need to be edited and is only included for you to compare it to. The pipenv commands will also create a pipfile.lock file containing an extensive information about the packages. The python_version entry may be different depending on the time that you use this guide. The entry will be your default version of python unless you specify a different python version on your virtual environment creation.
[[source]]
url = "https://pypi.org/simple"
verify_ssl = true
name = "pypi"

[packages]
flask = "*"
python-dotenv = "*"

[dev-packages]

[requires]
python_version = "3.7"
Conclusion
The above files should provide a good boilerplate for a scalable flask application. As with most boilerplate attempts, there are usually tweaks that you need to make but this should be good for most use cases and I've found this to work for me.